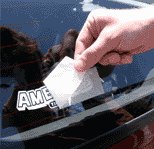
ONE WAY

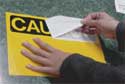
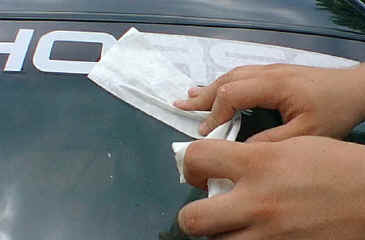
*1. Rub thin side
to help adhere art, then peal slowly.
2. Flip Art so it
is seen through thin paper correctly read.
3. Align art
without touching surface.
4. Smooth out using
squeegee (take your time, work from the center out).
5. Peal of thin paper slowly.
ANOTHER WAY
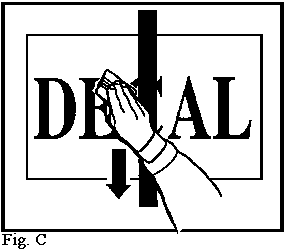
EITHER
TAPE ACROSS TOP OR ACROSS GRAPHIC.
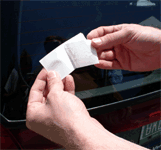
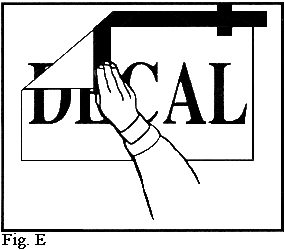
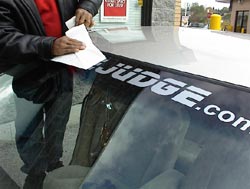
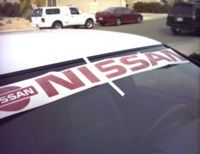
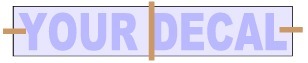
To remove the application tape from the graphic, pull the tape
against itself at a 180-degree angle. (See FIG E.) Do
this slowly.
PEEL TECHNIQUE, KEEP ANGLE ON COVER TAPE.
ANOTHER " WET TECHNIQUE"
1)Fill your spray bottle with water (preferably
distilled) and add a few drops of dish soap. (do not use too much soap)
2)Clean the windshield where the graphics will be placed. Alcohol works great.
The cleaner the better.
3)Pre-fit the graphics to know how it will fit and
where you want to place it. You can mark where the graphic will go with tape
or a grease pencil to aid in proper placement of the graphic.
4)Using the soapy water solution thoroughly wet
down the area of the windshield were the graphic will be applied.
5)Peel the backing paper off the graphic as you
spray the sticky side of the graphic.
6)Place the graphic on the vehicle making sure
that there is still plenty of the soapy water solution on the windshield and
the graphic.
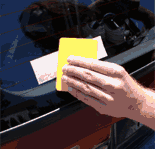
7)Squeegee the water out by using strokes from the
center to the outside of the graphic.
8) Remove the top tape after patting down the
decal with a cloth or paper towel/Insure it is dry
9)Pop any bubbles that are left with a pin.
LARGE
VEHICLE WINDOW GRAPHICS
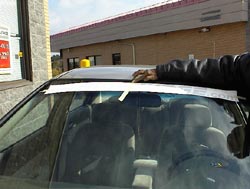

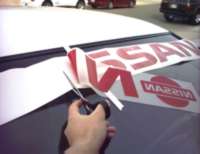
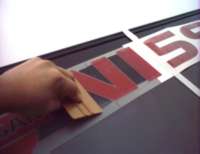
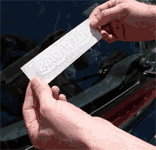
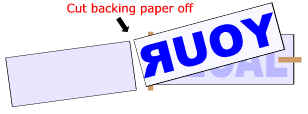
Take
the decal as you received it. Measure center of decal itself (not the
paper) than measure your surface area for proper aligning. Place a
small piece of tape on each end of decal and completely through the
center as shown in this picture. This crates a (Hindge)
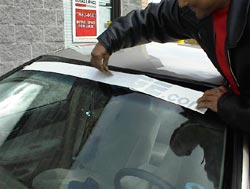
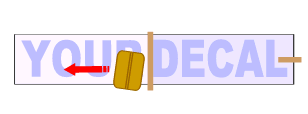
Now
take your proper aligned decal and remove the small piece of tape from
one end. Note:
Have your scissors and squeege within reach. Start separating the
decal from the backing paper slowly making sure all of the decal stays
on the application paper. Lay the decal back making sure not to stick
it to anything. Cut the backing paper off as close to the center tap
as you can. As shown in this picture.
We use 3M "cast" High performance vinyl , usually
220, and Neschen High Performance Vinyl. They both are rated from a minimum
of 7 years to 10 year exterior grade
For Banners and Temp purpose signage, we use Intermediate 3-5
year vinyl in most cases..
BANNER CARE INSTRUCTIONS
Banners are generally made of a plastic vinyl material.
They have a grain similar to cloth. We generally make your banner out of
mid/heavyweight 10 oz material. They are generally seamed along the top and
bottom sides and have grommets (Metal brass or aluminum rings) every
24 to enable easy hanging. We generally stock 24 , 36 " and
48 " banner material but can have banners custom made most any size.
Banners
can either be digitally printed or be lettered with cut vinyl or a bit of
both. We
have specials on both styles, see store offerings.
Our banner material can last 3-6 months
outdoors or even longer depending on the conditions. Generally in part time
useage, most of our clients get 3-5 Seasons of use .
Banners are sometimes being taken up and down,
stored, transported and re-hung, it is possible for the material or the
graphics to become damaged.
To extend the life of your Olysigns Banner please follow these instructions:
- When storing a banner, roll it up with the
lettering and graphics on the outside. If possible roll the banner
on a cardboard core ,but not to tightly.
- The banner should be stored on its side in a
dry, warm area. If it is stored upright (without a cardboard core), it may
bend over on itself damaging the lettering.(Store If possible in the
container it was shipped in )
- Vinyl banners may be cleaned with soapy water and
a rag.
- Wait 3 to 4 days after you have received your
banner before attempting to wash it. This will allow the pressure
sensitive graphics to adhere fully to the banner material.
- Ensure the banner is properly secured. It is
recommended to use bungee cords to secure the bottom of the banner
in high wind areas. The bungees will absorb much of the shock
created by the wind.
CAST VINYL
 Cast films, also known in the industry as premium, high-performance or 2 mil
are considered to be a premium product with excellent durability and
conformability characteristics. The term "cast" refers to the
manufacturing process of this type of vinyl. Making a cast vinyl film is a lot
like baking a cake. The vinyl begins with a "recipe" calling for a
list of ingredients known as the formulation. These materials are added to a
"bowl" or mixing churn in a predetermined order while mixing at
specific speed and for a set amount of time to ensure a complete and
consistent mixture. This liquid mixture, known as organosol, is then
"poured" or cast onto a moving web known as the casting sheet and is
then processed through a series of ovens which allows for the evaporation of
solvents. When the solvents are evaporated, a solid "film" is left
behind. The film is then wound up in large-diameter rolls for subsequent
adhesive coating. The casting sheet determines the texture of the film.
Cast films, also known in the industry as premium, high-performance or 2 mil
are considered to be a premium product with excellent durability and
conformability characteristics. The term "cast" refers to the
manufacturing process of this type of vinyl. Making a cast vinyl film is a lot
like baking a cake. The vinyl begins with a "recipe" calling for a
list of ingredients known as the formulation. These materials are added to a
"bowl" or mixing churn in a predetermined order while mixing at
specific speed and for a set amount of time to ensure a complete and
consistent mixture. This liquid mixture, known as organosol, is then
"poured" or cast onto a moving web known as the casting sheet and is
then processed through a series of ovens which allows for the evaporation of
solvents. When the solvents are evaporated, a solid "film" is left
behind. The film is then wound up in large-diameter rolls for subsequent
adhesive coating. The casting sheet determines the texture of the film.
Because the vinyl is cast on the casting sheet in a relaxed state, this
material offers very good dimensional stability. This process also allows the
film to be very thin (most cast films are 2 mil), which helps with the
conformability of the product. Material manufacturers recommend the use of
cast films on substrates such as fleets, vehicles, recreational vehicles or
boats where the customer wants a "paint-like" finish that will last
a long ti
"CALENDERED VINYL"
Like cast, calendered film also gets its name from the manufacturing process.
These films may also be referred to as intermediate, 4 mil, short-term or
economy. Calendered vinyl is formulated with similar raw materials as cast,
except that no solvents are used. The batch is mixed and heated to a molten
state that resembles pizza dough. Once the film reaches this molten state it
is extruded through a die and is then fed through a series of calendering
rolls. These polished steel rolls progressively squeeze and stretch the vinyl
into a flat sheet (similar to flattening out dough with a rolling pin).
Because the film is stretched into shape, it has some degree of memory and
therefore is less dimensionally stable than cast vinyl films. This means that
when a calendered film is exposed to heat the film will have a tendency to
shrink or pull back towards its original form. Calendered films also tend to
be thicker (usually 3.2 to 3.4 mils) than cast films because of the
limitations of the calendering process. Unlike casting where a textured or
smooth casting sheet is used to produce the film finish, calendering
implements a special finish cylinder at the end of the process while the film
is still warm. This process is extremely fast and is ideal for bulk production
runs. Therefore, color matching is very unattractive on these machines.
However, due to its bulk production with high yields, calendered films are
relatively inexpensive.
The quality of calendered films can range from economy to intermediate with
durability of one to five years. These films generally are not recommended for
vehicle applications because they are thicker, less conformable and less
durable than cast films.
The chart below lists several attributes of cast and calendered films and
how they compare to one another.
LETTER
VISIBILITY CHART
|
LETTER
HEIGHT
|
DISTANCE
FOR
MAX. IMPACT
|
READABLE
DISTANCE
|
|
3
in.
|
30
ft.
|
100
ft.
|
|
4
in.
|
40
ft.
|
150
ft.
|
|
6
in.
|
60
ft.
|
200
ft.
|
|
8
in.
|
80
ft.
|
350
ft
|
|
9
in.
|
90
ft.
|
400
ft.
|
|
10
in.
|
100
ft.
|
450
ft.
|
|
12
in.
|
120
ft.
|
525
ft.
|
|
15
in.
|
150
ft.
|
630
ft.
|
|
18
in.
|
180
ft.
|
750
ft.
|
|
24
in.
|
240
ft.
|
1,000
ft.
|
|
30
in.
|
300
ft.
|
1,250
ft.
|
|
36
in.
|
360
ft.
|
1,500
ft.
|
|
42
in.
|
420
ft.
|
1,750
ft.
|
|
48
in.
|
480
ft.
|
2,000
ft.
|
|
54
in.
|
540
ft.
|
2,250
ft.
|
|
60
in.
|
600
ft.
|
2,500
ft.
|
| |
Color Visibility Chart